The attraction of composite chainplates was not so much the strength-to-weight ratios craved by performance boats, but the simple engineering logic of using like materials throughout the hull structure and the complete watertight integrity obtained by the design. Their incredible strength is just a nice bonus.


I worked with Geoff Van Gorkom, at Van Gorkom Yacht Design, to engineer the chainplates. Before Geoff was able to the design the chainplates he had to calculate the righting moments for the boat and design a rig plan. He was truly a pleasure to work with. He made a concerted effort to understand my intent for the boat and design a solution appropriate to my skill level and technical constraints.
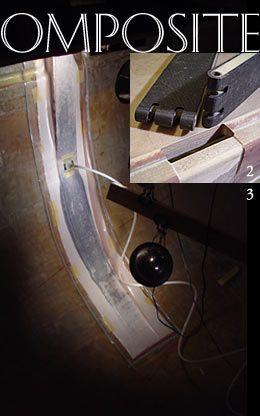
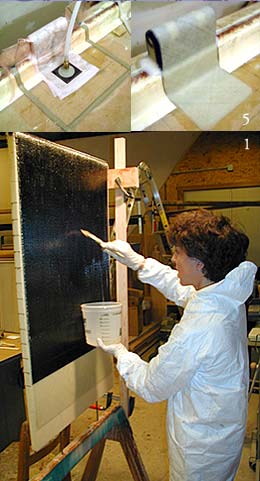
At the bench, my lovely wife helped me vacuum bag a part that consisted of twelve layers of unidirectional carbon encapsulating a 7/8" OD,

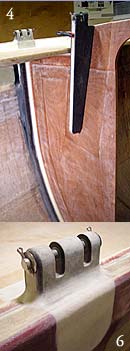
316 stainless tube and a 1" thick PVC foam core (1). You can just see the stainless tube in the upper left corner of this photo. From this fabrication I sliced four pieces: two to be mounted through the outer rail to receive the cap and intermediate shrouds, and two to be placed about 2' inboard, on a bulkhead, to receive the lower shrouds. Prior to installation, notches were cut through the stainless tubes where they would receive the turnbuckles, and the cap rail was notched where the chainplate assemblies would pass through to the curve of the hull (2). The outer chainplate assemblies were then laminated to the hull with twelve more layers of carbon unidirectional that carried down from the cap rail to well below the waterline on the internal surface of the hull (3). The web frame bulkhead was then installed and several more layers of tabbing around its perimeter contributed to encapsulating the chainplate assemblies even more (4). In this photo you can see the lower shroud assembly temporarily clamped into place on the bulkhead. On deck, 48 oz. of biaxial was laid in to tie the chainplates into the surrounding surface (5), and, in the final photo (6), the notches have been cleaned out and the 5/8" diameter clevis pin is in place. Every laminate in this process was done under vacuum bag, using System Three's Phase 2 epoxy.